Home › Forums › Photo Critique › Patriotic family photos
- This topic has 18 replies, 5 voices, and was last updated 7 years, 2 months ago by
 Lyd-B.
-
AuthorPosts
-
May 14, 2019 at 2:43 pm #39682
 Lyd-BParticipant
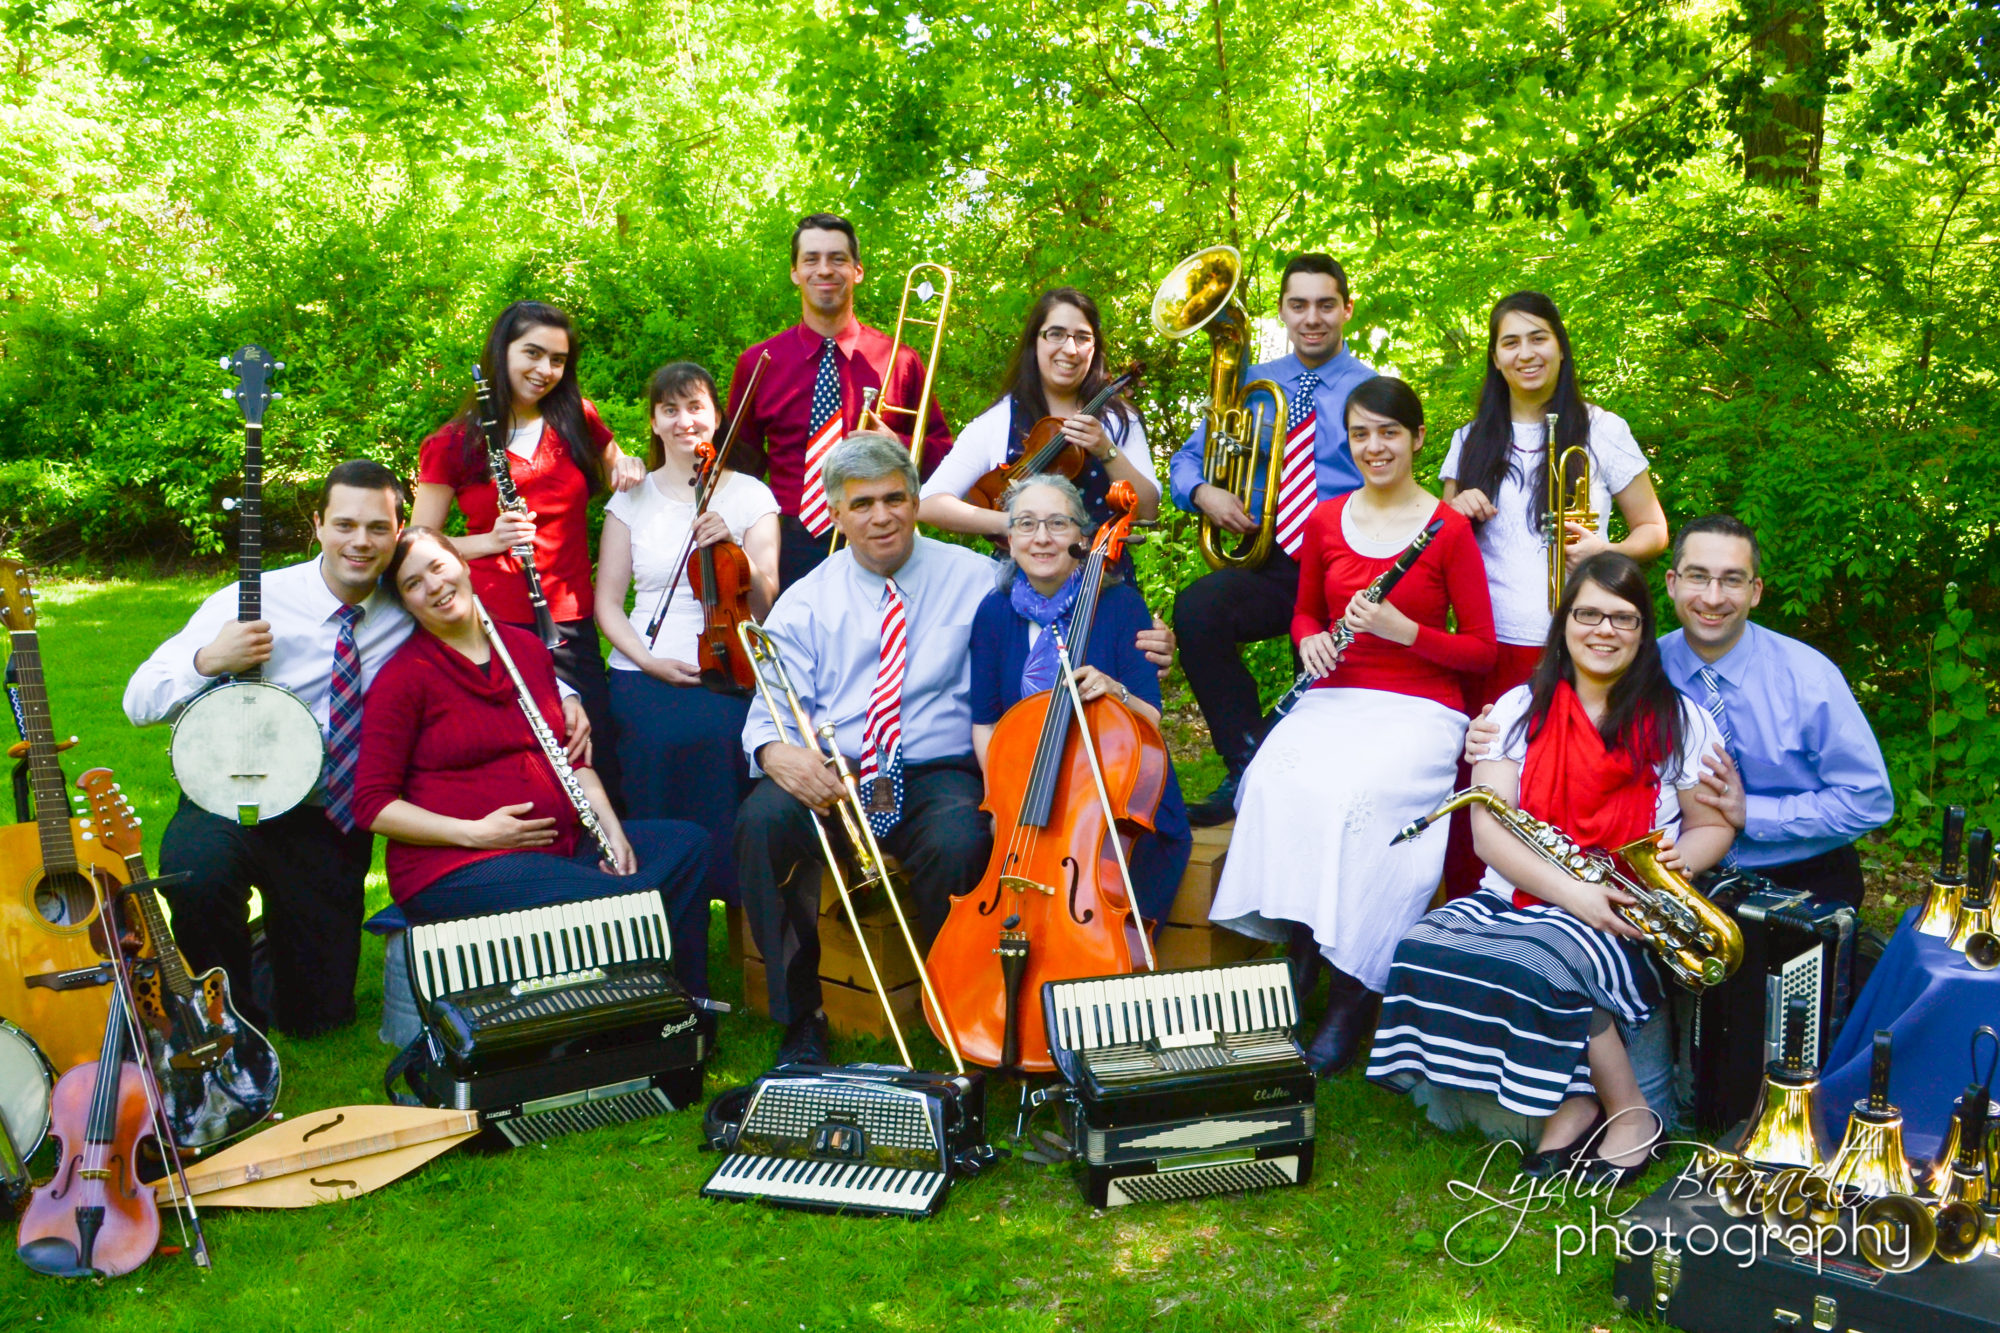
We had a family photo shoot on Saturday, and I’ve been working on editing the photos today. I’m having some difficulty with the quality, and I don’t quite know what else to do to improve it. I had to pretty severely underexpose when I was shooting the photo to avoid blown-out highlights with patchy sunlight. I think much of my problem has to do with that. Not sure what I should’ve/could’ve done differently as far as that goes, and now at this point, how to do the best with the photos that I have.
I realize this is a bit last-minute for the webinar tonight, @jamesstaddon, but if you have time I’d really appreciate hearing your thoughts. 🙂
Specs in filename; shot on tripod.
Attachments:
May 16, 2019 at 12:12 pm #39731 James StaddonKeymaster
What do you think @buddingphotographer or @nasa, do you feel it could be the lens to blame for the softness?
Perhaps that in combination with too much noise reduction? If @bennet-family, you said you had to brighten it up considerably, I assume you added a lot of noise reduction?
Buying a cheap speedlight to use for fill would definitely help in situations like this. Is this the kind that you use for your professional work @dhancock?
May 17, 2019 at 11:03 am #39772 David FrazerParticipant
As far as quality goes, those photos are better quality than many of the photos that I take – the composition and framing is top notch! The lighting is also quite good considering the situation, and I think you made the right choice in under-exposing to avoid blown-out highlights.
The quality issue that I am noticing is a sharpness issue. It does not look out of focus, and it is not motion blur. I think it’s a combination of lens quality and de-noising. I assume you shot in RAW.
De-noising, which is necessary when brightening dark photos, also makes the picture less sharp. Try playing with the different noise removal tool sliders some, in conjunction with the sharpening, equaliser, and/or clarity tools. I personally would be fine with a bit more noise if it makes the photo sharper.
For future reference, f/10 is a bit high for the Nikon 18-55 kit lens – from my experience with the version II of that lens it performs best around f/5.6 or f/8 and between 18mm and 28mm.
If you are considering buying another lens, I would recommend the 50mm af-s 1.8. I ended up selling my kit lens for about the same price as a used 50mm 1.8 prime. Both the 35 af-s 1.8 and the 50mm af-s 1.8 are much sharper than the kit lens, but they are both about 150US$ used, and you lose the advantages of having a zoom lens and you miss out on everything wider than 35mm, and though you almost never need that for portraits you might sometimes want it for other things.
I agree with James that some of the issues could have been averted with a just a bit of fill flash, as you would not have needed to rely so heavily on the editing software. For a flash, I use the TN560-III (41US$ used at B&H) and the YN560-TX controller (37US$ for the updated YN560-TX II) so that I can use it off-camera. I find it has plenty of power for 90% of what I do. It doesn’t have TTL, so the power must be adjusted manually. Total cost: 78USD + tax & shipping. You could also try with a 1000w work light, but that may not be bright enough.
- This reply was modified 56 years, 7 months ago by .
May 17, 2019 at 12:21 pm #39800Lyd-BParticipant@jamesstaddon, I actually didn’t add a ton of noise reduction. Luminance is at 18 on the first photo and 23 on the second. I usually try not to go too high on it so it doesn’t look too fake.
@dfrazer
I shoot in JPEG; I haven’t tried RAW out yet.I’ve attached one of the photos with no noise reduction added; the amount of noise is so unappealing to me though! :/
As to shooting at f/10, I almost always shoot at wider apertures, but I wanted to insure that everyone was in focus, so that’s why I went a bit more narrow. I guess I went a little too narrow? 🙂
I really haven’t looked into speedlights at all, perhaps I should. 🙂 I’m often frustrated by low-lit situations. I don’t really understand exactly how they work, so I think that’s part of what’s kept me from doing anything with them, and I haven’t taken time to research them.
Attachments:
May 17, 2019 at 12:50 pm #39813David FrazerParticipantOK, so the original photo is sharper, though it might have benefited from shooting at f/8 and shooting in RAW. (JPG format will actually grab information from neighbouring pixels, so it does make it a bit less sharp.) Shooting in RAW will help recover dark places with less noise also.
Personally, I prefer the noise over the lack of sharpness, but I am sure there is a way of significantly reducing the noise without making it noticeably less sharp. The Lightroom denoise tool breaks denoising into two types of noise: luminance noise and color noise. You could start by bringing luminance down to zero and play with the color noise removal first. Don’t try to remove all the noise, just bring it down to an acceptable amount. Once that is under control add in the sharpen tool. You will want to keep an eye on the masking slider to avoid sharpening areas of more uniform color where noise is most apparent.
May 17, 2019 at 1:26 pm #39817Ezra Morley
ModeratorAny chance we can see an original, non-resized photo? The compression and resizing has really taken a toll on the ones here on the forums… 🙁 (Maybe a dropbox link that you can remove later if you don’t want your full-res photos floating around on cyberspace…)
Heavy JPG compression tends to “smear” the photo enough that it’s hard to tell what is going on.I agree with @dfrazer that it definitely isn’t motion blur… My first thought was back-focus. (I have some experience with that little issue :))
It’s also possible that diffraction could be setting in at f/10, although I think it unlikely that it could have such a drastic effect on the sharpness! I almost never shoot at high apertures, so I don’t have much experience with the limits of diffraction.
@dfrazer is absolutely right about shooting in RAW vs. jpg. Of course RAW can’t overcome the limitations of poor glass, focus issues, or diffraction, but jpg files are not very forgiving when it comes to editing, especially if you have to “push” the file because it is too dark. If you regularly work in situations like this, you will do yourself a favor to shoot RAW, believe me!I would compare it to making gingerbread men. Shooting RAW is how we would normally make gingerbread men; with raw dough rolled out and cut with a cookie cutter, then baked. Shooting JPG is like baking the dough first, then trying to cut them out afterwards. You’ll have broken corners and crumbs (noise) everywhere…
I personally don’t stress out about noise much any more. Of course, getting a good camera that does very well with controlling noise helped a lot, but I realized quickly that at web-resolutions if you sharpen and resize and compress properly, the noise will not be an issue in 90% of cases. I’m definitely a pixel-peeper, so I still pay attention to it, but I don’t let it bother me like I used to. Like @dfrazer I’d take more sharpness at the expense of a little noise any day of the week.
May 17, 2019 at 2:59 pm #39828ModeratorDid I mention that if you were shooting RAW, you would have been able to expose for the highlights better, and not even have to “push” the photos as much in post-processing in the first place?! 🙂 ISO 200 should not be exhibiting that much noise unless you had to push it a couple of stops….
May 18, 2019 at 3:57 pm #39836Lyd-BParticipantHere are the originals, @buddingphotographer.
OK, you’re definitely pushing me closer towards trying my hand at RAW. 🙂
Attachments:
May 20, 2019 at 6:15 am #39856ModeratorThanks, @bennett-family. The forum must be resizing them, because they’re still limited to 2000px… You can upload the originals to this link if you’d like: https://www.dropbox.com/request/JrTFjj1ljDvS9qL54WnX I’ll delete them after analyzing them. 🙂
I popped one of these into RawTherapee to see what the exposure situation was. Here’s what the histogram looks like:

As you can see, the blacks are clipped in 2 channels (blue and green), and the highlights are nowhere close to being clipped. You probably could have exposed for a whole stop brighter before the highlights started blowing. If you want some more explanation about reading RawTherapee’s histogram panel, you can check out my RT tutorial here: https://youtu.be/bDXVpoXDtj0?t=245
That’s why I recommend enabling the histogram on your camera during image preview so that you can check stuff like this as you shoot!
As @jamesstaddon mentioned, a flash would have been awesome right here for filling in the faces. You’d definitely want a good diffuser though.. 🙂
Attachments:
May 20, 2019 at 5:03 pm #39870Lyd-BParticipantOh, you’re right! As I recall, there was a LOT more sunshine at first, so I think that’s why it ended up being ridiculously underexposed when the shadows came in at this point.
May 20, 2019 at 6:46 pm #39878ModeratorAs I recall, there was a LOT more sunshine at first, so I think that’s why it ended up being ridiculously underexposed when the shadows came in at this point.
That’ll do it… 🙁
I received your original files on Dropbox, and popped them into Lightroom for a little rinse-n-shine! 🙂 First of all, this is why I shoot RAW, instead of JPG:

What you see there is what happens when the black channel gets clipped, and then JPG compressions mangles it… 🙁 If you had exposed 1-2 stops brighter, this would not have been such an issue. But I know there’s no use in crying over spilt milk now!
Here’s my edited version: [Link to high-res here: https://www.dropbox.com/s/4fzopgtc40avf6z/Lydia%20Bennett%20-%2020190511-LGB_0654-5.jpg?dl=1]

Attachments:
May 20, 2019 at 6:55 pm #39888ModeratorHere’s a comparison with the file you posted earlier…

I’m not sure what your editing software was doing, but it was definitely blurring your photo more than it should have been. 🙁
Here’s a dropbox folder with the full-res and a few smaller resized versions for web and printing if you’d like to use my edit. https://www.dropbox.com/sh/q3hdgwzmxg0ab63/AAB9OMsm_-GSzfHcJiieEWj7a?dl=0
- This reply was modified 56 years, 7 months ago by .
Attachments:
May 21, 2019 at 6:46 pm #39929Lyd-BParticipantWow, thank you so much, @buddingphotographer!
Last time we had a photo shoot, I had a ton of blown out highlights, so I think that’s part of why I ended up going to the other end of the spectrum this time around. 🙁 Maybe next time I’ll hit the perfect balance! 🙂
I’m not sure what your editing software was doing, but it was definitely blurring your photo more than it should have been. 🙁
Well I’m sure it’s not my editing software that went wrong; I use LR 6 to edit. But I am relatively new to it, so it’s more likely like I’m the one that caused it to blur more than necessary. Would you be able to screenshot your edits to the photo so I can compare what you did to what I did?
Also, quick question about the RAW vs JPG discussion, my camera has options for JPEG [fine, normal, or basic] and RAW, but then also “NEF (RAW) + JPEG fine”. What exactly is that?
May 22, 2019 at 11:44 pm #39981 Logan LamarParticipant
@bennett-family NEF+JPEG is what it sounds like. Your camera will shoot a RAW file and process it for you (using it’s own internal “Lightroom”) as a JPEG, but will still preserve the RAW image as a separate file.
When your shoot JPEG, your camera actually shoots a RAW file, and then applies some enhancements to make it look nice, gives you what it came up with, and then throws away the RAW file. The enhancements applied to it depend on which Picture Control setting you selected before you started shooting. (On a Canon, it’s called Picture style; in Portrait mode, for example, it’ll bring some pink into the skin tones, whereas in landscape mode, it applies a good bit of saturation and contrast).When you shoot RAW+JPEG, your camera will still process for the JPEG (just like you’re used to), but when you put your card in the computer, you’ll find the significantly larger RAW file next to it—untouched by the camera. Note that the RAW file will look a bit ugly straight out of camera, much like undeveloped film looks terrible.
When you shoot RAW (only), your camera won’t even try to process the JPEG. It will just give you the RAW file for you to edit how you please.
@jamesstaddon only shoots RAW (I think, if I remember right). I used to shoot only JPEG, because I didn’t have any software to edit a RAW file. Once I got software, I still didn’t want to burn any bridges on JPEGs, because I don’t always have time to edit, and I don’t always need an amazing edit job, so I shot RAW+JPEG. This way, if I decide to go deeper than what the camera processed, I still keep that option open. But if my mom wants a shot of my little brother to put on her smartphone, I can give her the JPEG seconds after I’d shot it.One huge plus with RAW images is they can save a horribly underexposed image. I was photographing my little brother once, and the he looked at me with the most adorable expression. I took the shot, brought it inside, and realized I underexposed by about 3-4 stops (it was a mostly black image). I brought my RAW file into my processor, cranked the exposure knob over, and I saved my image.
I’d heartily encourage shooting RAW+JPEG for a while to get used to processing RAW files.
Hope this helps!
—LoganMay 23, 2019 at 9:20 am #39983ModeratorWow, thank you so much, buddingphotographer!
Last time we had a photo shoot, I had a ton of blown out highlights, so I think that’s part of why I ended up going to the other end of the spectrum this time around. 🙁 Maybe next time I’ll hit the perfect balance! 🙂
It’s a pleasure!!
This is why I advocate shooting RAW and enabling the histogram during image playback. If you keep an eye on your histogram, you can avoid extremes like this a little easier. 🙂
Well I’m sure it’s not my editing software that went wrong; I use LR 6 to edit. But I am relatively new to it, so it’s more likely like I’m the one that caused it to blur more than necessary. Would you be able to screenshot your edits to the photo so I can compare what you did to what I did?
I see. Sounds like a sharpening tutorial might come in handy here! 🙂 In the mean time, here are a few links to get you started. They’re not specific to Lightroom necessarily, but the principles of sharpening are universal, so you will likely find some good tips to get you started.
https://www.lenspiration.com/forums/topic/macro-bumblebee/
https://snowflake.nfshost.com/web/gimp-tutorial/gimp-sharpen-tutorial.html
https://youtu.be/bDXVpoXDtj0?t=1206Looks like James even has a video for PRO members about it: https://www.lenspiration.com/video/how-sharpen-photos/
Also, quick question about the RAW vs JPG discussion, my camera has options for JPEG [fine, normal, or basic] and RAW, but then also “NEF (RAW) + JPEG fine”. What exactly is that?
“NEF (RAW) + JPEG fine” means that the camera will save both a RAW and a JPG file. The jpg file is handy for quick previews, and if you decide you don’t want to edit the RAW, you can always just use the JPG version. I don’t use it much, simply because it causes unnecessary duplication. I have too many pictures as it is! 🙂
-
AuthorPosts


You must be logged in to reply to this topic.