Home › Forums › Photography Q&A › Resize and Compression Tools for Photographers
- This topic has 2 replies, 2 voices, and was last updated 10 years, 3 months ago by
 James Staddon.
-
AuthorPosts
-
November 25, 2014 at 12:50 pm #8496
Ezra Morley
ModeratorI have previously written about some photography related software, Exif viewers, and Photo viewers.
Now I want to show what tools I use as a photographer and web designer for resizing and compressing images, so that you don’t have to wait 3 minutes to view that 24 megapixel, 12.3 MB photo that I sent you a link to. First, we’d better be sure that we know the difference between resizing, and compressing. Resizing very literally changes the size of the picture. If you have a 12 megapixel camera, it takes pictures that measure about 4000px by 3000px, that makes 12,000,000 pixels (or 12 MP [megapixels]). Now, your computer screen likely has a screen resolution of 1024×768, or in my case, 1440×900. That makes 1,296,000 pixels, (or 1.3 MP). Obviously, that’s a whole lot less than 12 MP! When you send an e-mail with a picture in it to someone, the picture might be about 800 pixels wide, that would take up a little more than half of my computer screen. For most websites, that’s a maximum of about 1200 pixels. Very few people need more than that, and most people don’t ever even need to see the picture fullscreen. The thing to remember is… never send a picture that is bigger than would fit on someone’s screen, it’s just a waste of bandwidth! So if you’re sending Grandma some pictures of your grandchildren, resize them to somewhere between 800-1200 pixels on the long edge, and she will be able to see them just as well, while she’ll only have to wait for 20 seconds, instead of 3 minutes for them to download!
I personally make use of a little program called ‘Fast Image Resizer‘ all the time. (Download it here.) It’s extremely easy to use, just drag-and-drop the pictures you want to resize over the window, and it will resize them all, whether there’s 1 picture, or 500 of them! You can select the resolution you want from the drop-down list of options, it has many of the common ones already there.

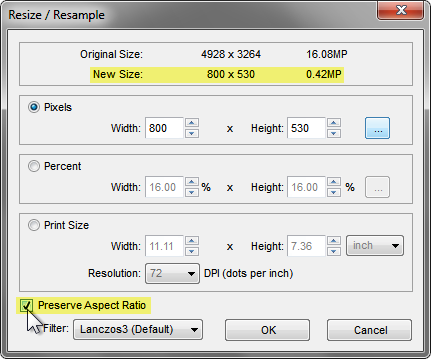
If you are using FastStone Image Viewer (which I highly recommend) then you can resize pictures with it also! Just open the picture that you want, then hit ‘CTRL + R’ to bring up the ‘Resize’ dialog. You’ll have to type in the size for the long edge, or you can set it as a percentage of the original. Please make sure that “Preserve Aspect Ratio” is checked, otherwise you’ll get skewed results.
Now for ‘Compressing’ images. I just created some examples for this thread, but I’ll post them here as well. First, let me mention the software I use…
RIOT (Radical Image Optimization Tool) This is a truly great tool, it gives you a visual before/after comparison of the compressed and uncompressed images, as well as showing how much of a file-size decrease that you get.
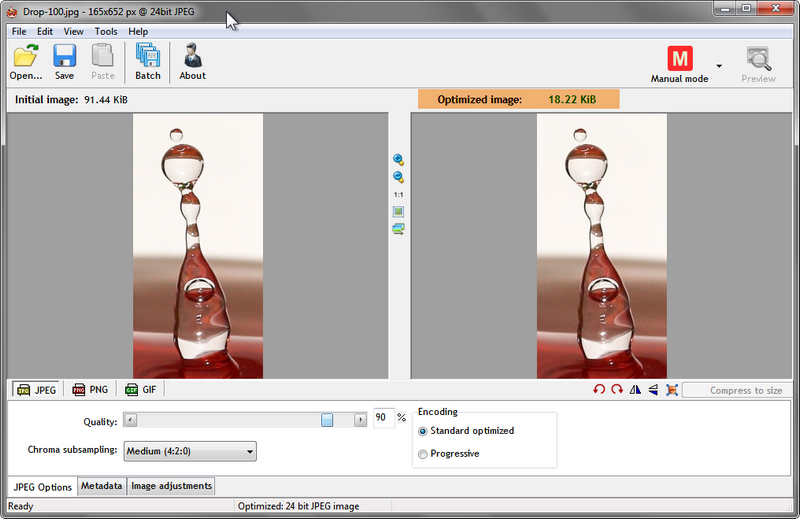
It gives you 3 options for file formats. In general, for photographs, you’ll want the .jpg or .jpeg extension, the author of RIOT has an article describing the differences and pros and cons of each here: Basic understanding of web formats
Again, FastStone Image Viewer has a feature virtually identical to RIOT. Open a picture with FastStone Image Viewer, and go to the “Save As” menu, (Ctrl + S) You can select the file format, (highlighted in yellow below) and then click on the “Options” button (highlighted in red) which will give you the compression options.

Now for those illustrations I talked about….
These were made with the GIMP and the quality options shown are from the GIMP ‘Export as… .jpg‘ dialog.

I also created one with an actual photograph which I’ve written about here as well.
You need to view it at 100% to really see differences correctly, here’s a link to view it fullscreen…
Obviously the “Quality 0” is an extreme example, but it shows the kind of processing that’s going on. Take a look at the background color as the quality decreases, it changes from an off-white to light pink, to light green, to grey, to white.
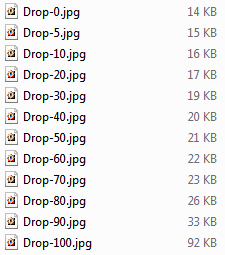
Also of interest are the file sizes…
- This topic was modified 55 years, 2 months ago by .
November 25, 2014 at 2:54 pm #8513Ezra Morley
ModeratorNow let’s take this knowledge and apply it to a real-life scenario. I have a picture here that I took while I was in Africa this summer. I edited it in Lightroom and exported it as a .jpg file to my hard drive.
Here are the specs so far…

Here’s a link to the original file on Dropbox.com: IMG_4831
Now, I’m going to resize and compress the file with FastStone Image Viewer. So, I open the file in FastStone Image Viewer and hit “Ctrl + R” to open the resize dialog. I’ll make it 1200px by 800px.

Now, we need to save our resized file, so we hit Ctrl + S to bring up the “Save As” dialog. Here we will set the compression settings with the “Options” button.
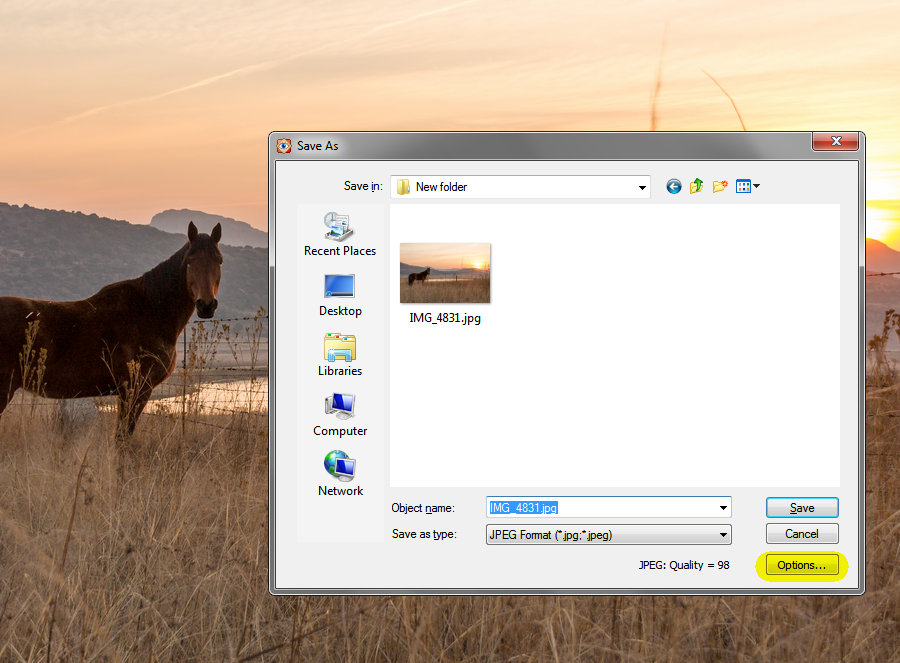
I chose a setting of 85 for this particular picture, you have to experiment to find the best options. You can compare the two results side-by-side, or you can click and hold the little green arrow (circled in yellow below) to overlay the compressed over the original.

Now just save the image, and we can compare it to the original!

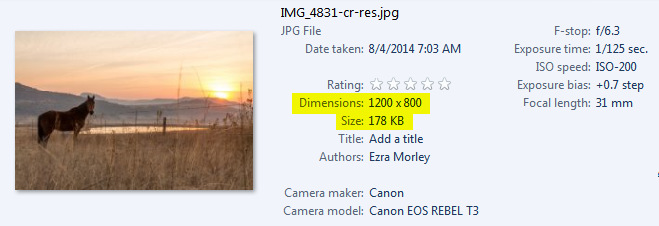
From 6.70 MB to 178 KB, not bad! That comes out to only 2.657% of the original!

Finally, here’s the final resized & compressed version. (Click on it to open it in the lightbox.)
Wow, that is one pile of attachments at the bottom! @JamesStaddon, if you want, you can remove them, as long as it doesn’t actually delete the file, just “hide” it from the post.
November 26, 2014 at 8:11 am #8539 James StaddonKeymaster
You’re comments are valuable, @buddingphotographer. Many photographers on the Lenspiration site do not use the “expensive” programs that I am accustom to using which can sometimes cause a sort of disconnect when it comes to answering questions on the post-processing side of things. So having the experiential advice, recommendations and answers on these forums from someone who uses and is familiar with the less conventional way of doing things, is very beneficial! Thank you.
I will direct people to this tread when they have questions about image resizing and compression outside of Lightroom and Photoshop!
-
AuthorPosts
You must be logged in to reply to this topic.


