Home › Forums › Photography Q&A › (Easy to read) User Guide for Youngno YN-560 III Speedlight
- This topic has 6 replies, 4 voices, and was last updated 10 years, 2 months ago by
Ezra Morley.
-
AuthorPosts
-
April 21, 2016 at 7:14 pm #16655
Ezra Morley
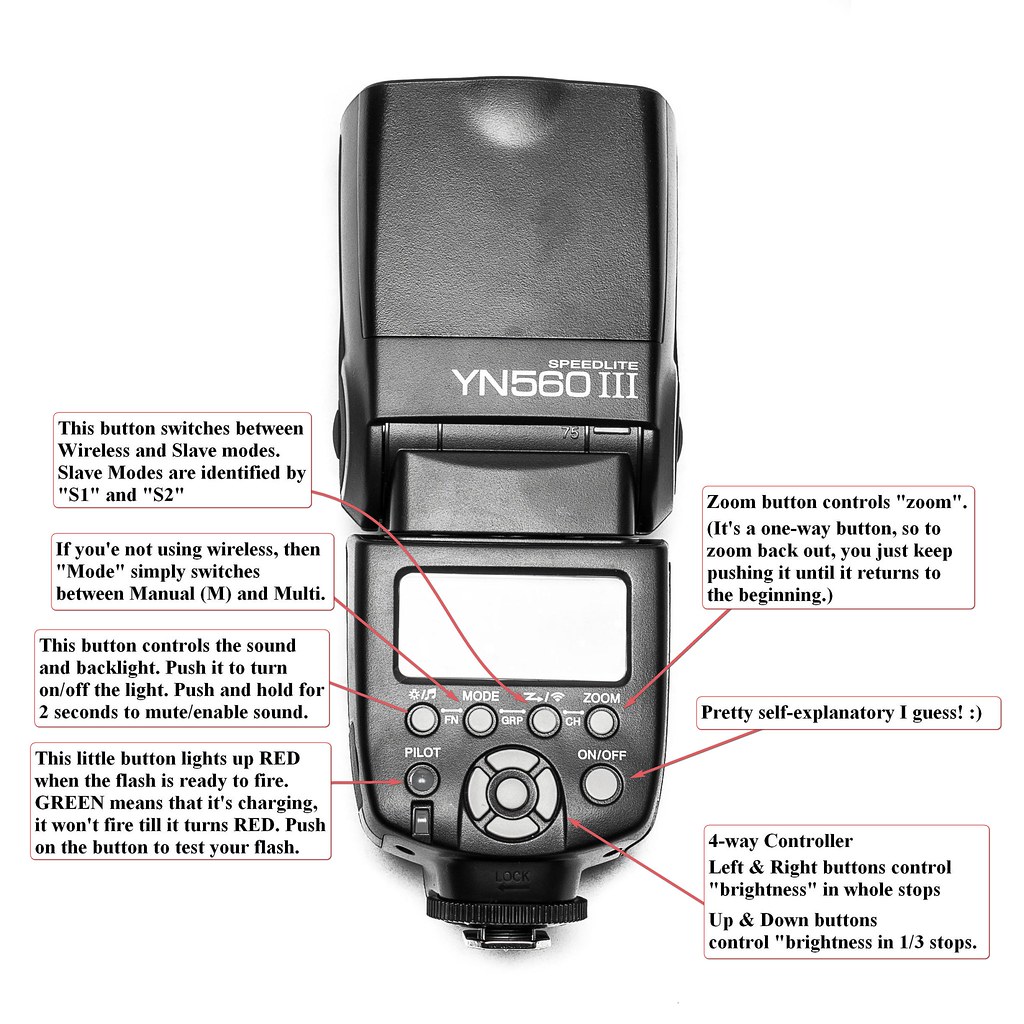
ModeratorHere’s a quick graphic that I made up, I’ll add more info later as I get to it. 🙂
Let’s start out with “Stops”. As you may already know, stops are quite important to photography, it’s a way of setting a value to light, so that you have a precise method for metering and exposing.
I don’t really know how to explain any better than that, so I’ll just give some examples. We’ll start with ISO.
- ISO 100 to ISO 200 is 1 stop.
- 200 to 400 is 1 stop.
- 400 to 800 is 1 stop.
- 800 to 1600 is 1 stop.
- 1600 to 3200 is 1 stop.
- 3200 to 6400 is 1 stop.
- 6400 to 12800 is 1 stop.
- 12800 to 25600 is 1 stop.
- 25600 to 51200 is 1 stop.
- 51200 to 102400 is 1 stop.
I think you get the point. 🙂 You notice that ISO is easy to calculate. To add a stop, just multiply the number by 2. You can use multiple stops as well: ISO 100 to ISO 800 is 3 stops. ISO 50 to ISO 51200 is 10 stops!
Next is Aperture:
- f/1.4 to f/2 is 1 stop
- f/2 to f/2.8 is 1 stop
- f/2.8 to f/4 is 1 stop
- f/4 to f/5.6 is 1 stop
- f/5.6 to f/8 is 1 stop
- f/8 to f/11 is 1 stop
- f/11 to f/16 is 1 stop
- f/16 to f/22 is 1 stop
- f/22 to f/32 is 1 stop
- f/32 to f/45 is 1 stop
- f/45 to f/64 is 1 stop
As you can see, aperture is a bit more tricky, it’s not merely 2x like the ISO. This one you’ll have to memorize to know. Thankfully, most lenses only go from about f/2.8 to f/22, so thats not all that many! One easy thing to remember is that if you double the aperture, that’s 2 stops. So f/2.8 x 2 = f/5.6 The number to use to calculate 1 stop is 1.414 | f/4 x 1.414 = f/5.6 (You’ll have to round the numbers down)
Third, we’ll look at shutter speeds:
- 1/1000″ to 1/500″ is 1 stop
- 1/500″ to 1/250″ is 1 stop
- 1/250″ to 1/125″ is 1 stop
- 1/125″ to 1/60″ is 1 stop
- 1/60″ to 1/30″ is 1 stop
- 1/30″ to 1/15″ is 1 stop
- 1/15″ to 1/8″ is 1 stop
- 1/8″ to 1/4″ is 1 stop
- 1/4″ to 1/2″ is 1 stop
- 1/2″ to 1″ is 1 stop
It’s pretty obvious that for the most part, shutter speeds are 2x also, but they’re rounded down as well. Actually, to be technical, they’re already rounded down. 1/1000″ is actually supposed to be 1/1024″.
Anyway, now that we’ve got stops all figured out, we can move on to how this relates to flash and exposure. The nice thing about stops is that they’re all equivalent. Let’s take an imaginary example: I took a photo at ISO 100, f/4, and 1/500″. I can change from ISO 100 to ISO 400, (+2 stops) but to keep the exposure/”brightness” the same, I’ll have to change the aperture to f/5.6 (-1 stop) and make the shutter speed 1/1000 (-1 stop) So if I add 2 stops, and subtract 2 stops, I still have the same exposure, just with different settings!
Now, to go along with our imaginings, let’s suppose that we’re indoors, and there’s not much light. We are using ISO 400, f/4 and 1/60″. We’re getting motion blur in our pictures, because the shutter speed is too slow, but we don’t want to push the ISO too much because we want as little grain as possible. So, we add another light source, called a flash! It’s not a TTL flash, so we have to set the power/brightness manually. So we get the brand-new speedlight out of it’s box, and fasten it onto the camera. When you turn it on, it shows a little “M” in the corner, and in large letters it says “1/128”. So you leave your camera at it’s same settings, (ISO 400, f/4 and 1/60″) and you snap a picture. Nothing much changes, it’s still too dark, and you get ready to toss your flash into the trashcan. 🙂 Wait a minute! Think about your stops again for a minute… A flash’s brightness is measured in stops too! Here they are in order from brightest to dimmest:
- 1/1
- 1/2
- 1/4
- 1/8
- 1/16
- 1/32
- 1/64
- 1/128
So when it turned on at 1/128, it was at it’s lowest setting! Try turning it up a couple of stops, say to 1/32 power, and take another picture. Once you’re getting a properly exposed photo, you can use stops to correctly change exposures without affecting brightness. Say you want to stop down for more sharpness/depth-of-field, so you stop down to f/11 (The other settings are the same: ISO 400, 1/60″ and the flash at 1/32 power) From f/4 to f/11 is 3 stops. So to compensate, bump up the flash by 3 stops! 1/32 -> 1/4. Your picture should look the same as far as brightness goes.
Boy, I guess I’m getting rather wordy! Hopefully this is helpful! I’ve actually learned a few things in the making of this, so it was good for me too! I also learned that one of my speedlights is defective! 🙁 Good thing Adorama has a return policy…
.
- This topic was modified 56 years, 6 months ago by .
Attachments:
April 21, 2016 at 7:22 pm #16658 Joseph CamusoParticipant
Great job!! Thanks for sharing! 🙂
April 22, 2016 at 8:33 pm #16670ModeratorI updated the post with a lot more information…
April 25, 2016 at 6:59 pm #16707 David FrazerParticipant
This is a great starter on speedlights! I am looking into getting set up with 3 or 4 remotely controllable lights, possibly YN-560 III’s, along with the Yongnuo YN-560-TX controller. How you like it?
One more comment: if the flash is your main light source, adjusting your shutter speed will not affect the exposure much because the flash sends all that light out really fast. Adjusting the aperture and ISO will have the normal effect.
April 27, 2016 at 4:45 pm #16724ModeratorThanks, @dfrazer!
I have never used the YN-560 TX, so I can’t really comment on it, but the YN-560 IV is basically the TX with a flash on the end of it. It’s very handy to be able to adjust the power on the lights remotely! However, I don’t know whether you’ll be able to make individual adjustments to each speedlight, or whether they will all be adjusted at the same time. I’d be happy to test and find out though, if you send me a few of the flashes! 🙂 Seriously though, with a combination of groups and channels, I think there has to be a way to do it.
I would definitely recommend that you buy from an authorized retailer like Adorama or B&H. I already found out that Youngno has some issues with reliability. Youngno has a 1 year warranty on their flash, and it’s worth the peace of mind to know that Adorama will replace them for you if it goes bad with no questions asked.
One more comment: if the flash is your main light source, adjusting your shutter speed will not affect the exposure much because the flash sends all that light out really fast. Adjusting the aperture and ISO will have the normal effect.
You’re right, I guess I forgot to mention that in this post. I remembered having mentioned it before, (obviously in another post though) so I figured I had it all covered, when I didn’t! 🙂
April 27, 2016 at 9:11 pm #16726Dan Cope
ParticipantThis is a great post @buddingphotographer! Thanks for taking the time to put this together🙂
April 29, 2016 at 1:12 pm #16741ModeratorYou’re welcome, @dan-cope! Hopefully it comes in handy for someone(s) who wants to learn about manual flash photography. There’s obviously a lot more territory to cover, and I’ll work on getting some more info together soon, (hopefully).
-
AuthorPosts

You must be logged in to reply to this topic.