Home › Forums › Photography Q&A › 12 Tips for Puppy Photography
- This topic has 54 replies, 7 voices, and was last updated 9 years, 3 months ago by
Ezra Morley.
-
AuthorPosts
-
June 13, 2016 at 9:41 am #17369
Ezra Morley
Moderator@Hannahm, this topic is written especially for you. I saw your puppy pictures that you submitted for the Pro Critique, and mentioned it to my sister. She said, “We should do a write-up of some tips for puppy photography, since we do quite a bit of puppy photography ourselves!”
So, without further ado, here are 12 tips for photographing puppies.
TIP #1: Have oodles of patience. 🙂 Puppy photography is not something where you just go out and snap a few photos and come back with adorable pictures. You have to work to get a good picture of a puppy!
TIP #2: Enlist some aid/find a good helper. We have taken 1,000’s of puppy photos, and believe me, an extra set of hands is invaluable! The photographer is supposed to be taking the pictures, not trying to pose the puppy and make it sit still… 🙂 You as the photographer have to be ready to capture that split-second when the puppy is holding still and looking good! Let the assistant be the one to run after it when it dashes off, catch it, and try to make it look good.
TIP #3: As @JamesStaddon mentioned in the Pro Critique, your background is also very important to the success of your photo. Since we have lots of puppy photos, we can probably give plenty of examples of bad and good backgrounds. We just went looking through our files, and came up with a few…
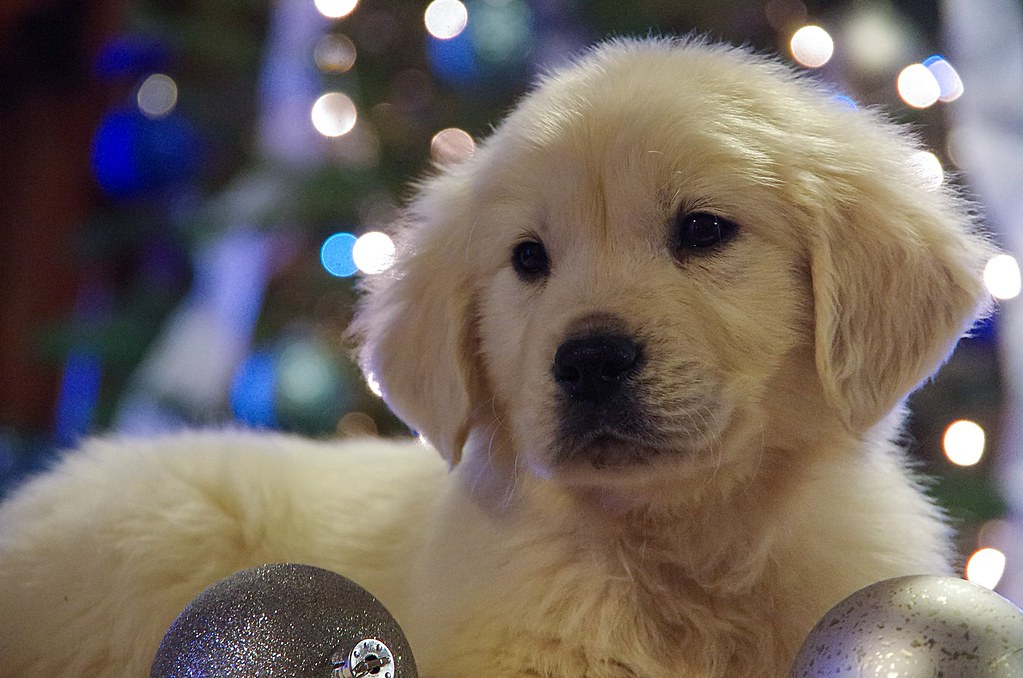
In this example, I was taking pictures for some of my relatives. I was shooting indoors because it was wintertime, and the lighting was rather bad. I did not have my speedlight at that time, so I was shooting at high ISO. It was near Christmastime, so we put their little Christmas tree in the background. Good idea, but bad implementation… It almost looks as if the tree is growing out of the puppy’s head. (That’s not a good thing 🙂 )

Here’s a slightly better background, using the “real” big Christmas tree.
This might be a slightly “better” example of a bad background. In this case I didn’t have a helper, so I had to put the puppy on the picnic table bench so it wouldn’t run off! 🙂 As a result, I didn’t have much control over the background. One redeeming factor in this case is that the background is nicely blurred. And that is a tip for later on…

And here’s an example of a better background. It’s definitely not perfect by any stretch, but it’s a good step in the right direction anyway! I usually shoot a little bit more to the right, so that bright area in the left wouldn’t show up, but the puppy had a mind of it’s own! Sometimes it’s a compromise between a good background, and a cute pose.

TIP #4: Get down to the puppy’s level. I’m often lying on my stomach in the grass to get pictures like the one above.
TIP #5: Watch your puppy’s ears. A dog’s face shows it’s mood just like humans do. And the position of it’s ears has a lot to do with how happy (or sad/angry) it’s feeling. On multiple occasions I have had 2 nearly identical pictures, but in one the puppy had perked up it’s ears a little, making a much cuter, more pleasing picture.
TIP #5-1/2: Try to keep the puppy’s head up. He’ll look better if he’s looking right at the camera, not down at the ground, or up in the sky. 🙂

TIP #6: Don’t be afraid to take lots of pictures! It’s not uncommon for me to do a photoshoot for a litter of puppies and come away with a couple of hundred images. I know that the last thing you want to do is sort through 250 pictures after putting up with wriggly puppies for the last hour and a half, but that’s part of being a puppy photographer!
TIP #7: Keep out of direct sunlight. This is one rule that you really shouldn’t break. It shouldn’t be too hard to find some shade somewhere! 🙂 Also, as @JamesStaddon mentioned, you could try some fill-flash if the eyes are a little on the dark side. Thankfully you’re starting out with light-colored puppies! I have the hardest time properly exposing black puppies! 🙁
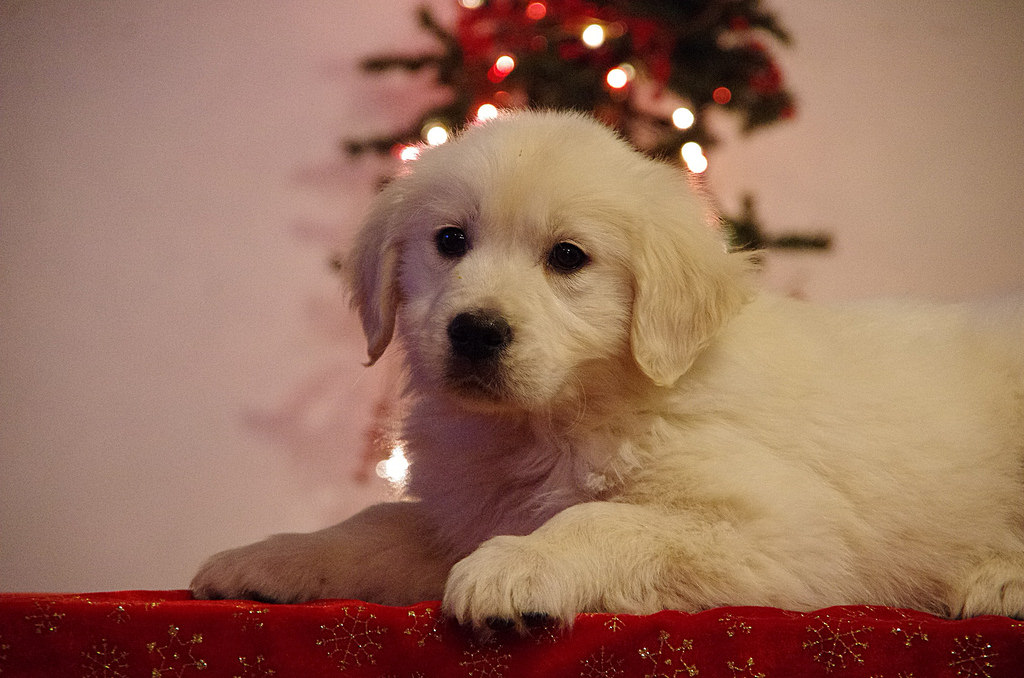
TIP #8: Speaking of light colors; if you have to photograph indoors for any reason, try a light blue or pink pillowcase/sheet for a background. If nothing else, a white background is a good neutral one. Here’s an example of a light background taken indoors (with a speedlight):


TIP #9: Use some props for interest’s sake. A nice prop can make a good picture into a great picture! We’ve used many many different props, from pumpkins, to potted flowers, to baskets, to clothes baskets, to little red wagons!


TIP #10: Take a minute or two to brush the puppy’s fur and make sure there’s not any “goop” in their eyes. It’s amazing how something like that won’t show up until you get a perfect pose, and then it’s hair is all mussed, and it’s eyes are draining. 🙂
TIP #11: Of course, it’s important to make sure that your picture is sharp! If you spend a little time browsing puppyfind.com, you’ll see plenty of blurry photos. There are 2 major challenges to overcome, motion blur and improper focus. To prevent the motion blur problem, keep your shutter speed to a minimum of 1/100, ideally more like 1/160 or 1/200 (Or even higher if you have enough light). As for focus, well that’s a little more tricky… Manually select a focus point for sure, don’t let the camera try to guess where you’re wanting to focus. I usually use the center focus point since they’re generally the most accurate (at least in older cameras). If you’re worried about breaking the rule of 1/3rds by always having the subject in the middle, then try backing off, and cropping to a 1/3 later in post-processing. Shoot in lots of light, camera AF systems are getting better all the time, but the more light you have, the better chance they have of achieving a good focus. Remember that AF systems work by detecting contrasts. So don’t put your AF point on the broadside of a brown puppy’s body, and expect it to be able to tell when it’s in focus. If puppy has dark eyes/nose, use that as a good contrast point to focus on. The eyes are the most important thing to be sharp; if you can get the puppy’s eyes in focus, then you’ve got a good photo (sharpness-wise anyway 🙂 )
TIP #12: Speaking of sharp… There’s some computer work involved as well! And one of the most important things is sharpening. Puppy hair and whiskers almost always need a little sharpening to make them pop and look really sharp (when they’re viewed at web-size especially.) If you’re using Lightroom, set the “Radius” for sharpening to at least 2, or 2.5
TIP #13 BONUS: (Optional) Buy yourself a “Nifty Fifty” lens. In your case, it’s the Nikon 50mm f/1.8 One of the best things I did to help my puppy photography was to buy the nifty fifty. It has a nice wide aperture, so you can get lovely out-of-focus backgrounds. It’s also plenty long in focal length so that you don’t get wide-angle distortion. Being a prime, you don’t have to worry about zooming in or out, and no problems with variable apertures either! I recommend that you shoot between f/2 and f/3.5 as a good compromise between optimal sharpness and good background blur.
Whew, is that enough to get you started? Let me know if you have any questions! I’m sure you’ll have some after trying to decipher my writing! 🙂
- This topic was modified 56 years, 7 months ago by .
Attachments:
June 14, 2016 at 9:35 am #17378 Hannah MooreParticipant
That would be great! I don’t recall you having puppies! I would be interested in what type of pictures you take for puppies poses. This is a new, fun, challenge for me and I will look forward to hearing from one of your sisters!
June 14, 2016 at 3:31 pm #17394ModeratorThere you go, @Hannahm! I don’t know how that little bit got posted before I had finished writing, but it’s all there now…
Yes, we have puppies, just not all the time. 🙂 I have done photography for other people’s puppies as well, so I’ve got lots of photos to choose examples from!My sister mainly fills the assistant role outlined in TIP #2, (and she does a very good job!) but she loves to photograph them as well! (She also has most of the creative ideas for props; TIP #9) She took my puppy lens the other day and trained it on her kitty, and this was the result:

Attachments:
June 14, 2016 at 4:25 pm #17396Hannah MooreParticipantActually, can you send me some more ideas, that wasn’t good enough – I already know all that.
No, just kidding! 🙂 That all will be very, very helpful after many, many hours of reading it over and over and seeing if I understand the directions right!! 🙂 Wow! That gave me a lot of things to think about, and work to do. I don’t think you’ll need to worry about writing any more puppy essay’s for me for awhile now!!
So,….. Where do I begin???!!! 🙂 …Don’t worry, I’ll try to begin somewhere on that essay! 🙂June 16, 2016 at 1:31 pm #17417 James StaddonKeymaster
Your tips and example pictures are absolutely phenomenal! Thank you so much for sharing! This makes me want to go out and start photographing our pet. 🙂
June 16, 2016 at 1:49 pm #17420ModeratorThank you @JamesStaddon! Hopefully it’s useful to aspiring puppy/pet photographers! 🙂
June 20, 2016 at 1:35 pm #17473ModeratorI just added a few more example photos from our files…
June 20, 2016 at 3:16 pm #17477Hannah MooreParticipantThose puppy pictures are so cute, @buddingphotographer, and they’re great ideas to try out for puppy poses!! Oh! Hey, would you mind me using your puppy lens like your sister did? 🙂 I only need it until July, because they’ll probably be sold by mid July!! Right now, if I were to buy a lens, it would be an up-graded one from my 50mm lens!
- This reply was modified 56 years, 7 months ago by .
June 20, 2016 at 7:07 pm #17479ModeratorUnfortunately you’d have to borrow my camera too, because my Pentax lens won’t fit your Nikon. Also, my camera is stuck in Manual Mode, do you think you’d be able to handle that on top of trying to get everything else to work in puppy photography? 🙂
What you should do is buy the 50mm f/1.8 and use it for puppy photography, then sell it to your siblings who are in the soap-making business, and they can use it for product photography!
June 20, 2016 at 7:28 pm #17480Hannah MooreParticipantI don’t know much about Pentax, or nothing at all of how to change the settings, but I actually use manual all the time. I rarely use any other mode.
Do you mean the light box that @emilym uses, or just soap being made, because I do take pictures of people making soap, or other soap products when I get a chance…not the light box though! BTW, isn’t “this” lens mainly for puppy’s or animals in general? What’s the difference with using 50mm to a 140mm lens??
June 20, 2016 at 8:11 pm #17481ModeratorI don’t know much about Pentax, or nothing at all of how to change the settings, but I actually use manual all the time. I rarely use any other mode.
Good for you! I wouldn’t normally use Manual much, but I’ve been using it a lot more lately out of pure necessity! 🙂
Yeah, by product photography, I mean “the lightbox that @emilym uses”. 🙂
“This” lens can be used for anything at all, it’s not necessarily designated for any one thing. Puppies and products are just two uses for it. @freedomphotography found out that the 50mm makes a great portrait lens too!
There are a couple of advantages to the 50mm.
- It’s small and light compared to the 18-140mm.
- It’s sharp! (Of course, the 140mm is too, but a long zoom like that can’t compete with a prime lens for sharpness.)
- It’s “fast”. (It has a wide aperture which makes for good background blur.)
All 3 of those advantages are very handy when photographing puppies. I’m not saying that you can’t use your 18-140, it will work just fine if it needs to. (I used to use my 18-135mm for puppies before I bought my 50mm.)
Here’s a bonus tip if you do use your 18-140mm lens for puppies:
- Always zoom in to about 35mm for best results. Taking puppy pictures at wide angles will distort their faces in a very non-flattering way. Don’t ask me how I know. 🙁 ) [The same goes for people too…]
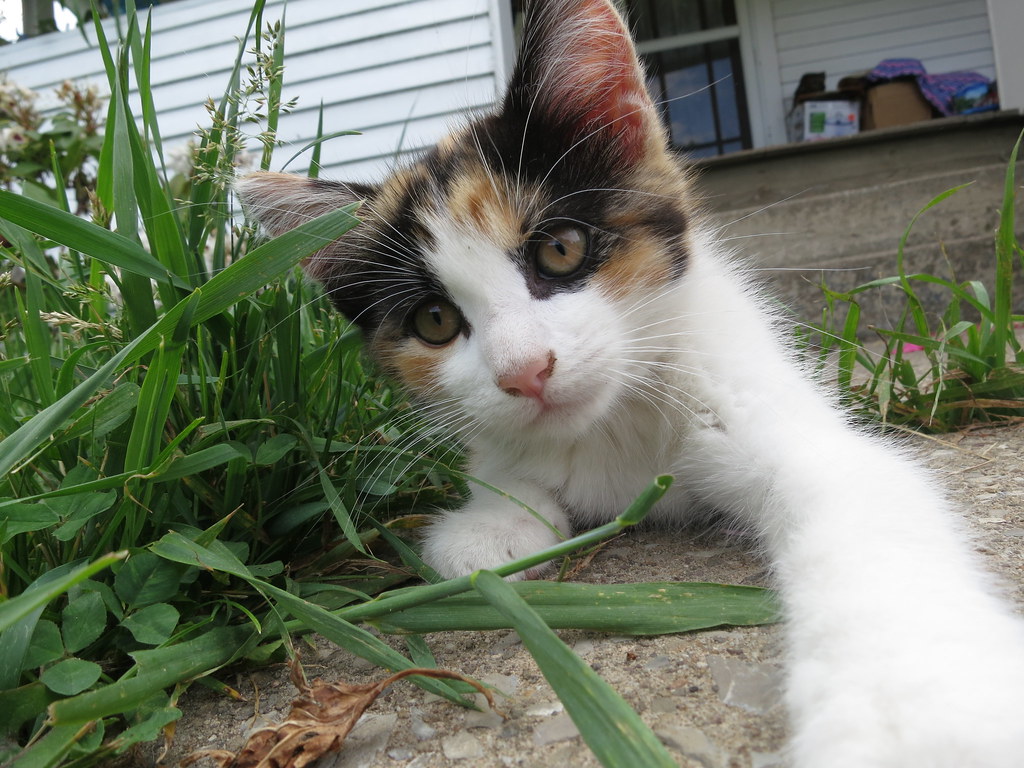
The kitten is our only cute young pet right now, so it gets all the camera time! 🙂 This photo looks sort of cute because it’s up close. I intentionally got up close for the “artistic” effect. That photo was actually taken with my little Canon point-n-shoot camera.Attachments:
June 23, 2016 at 9:56 am #17536Frazer Family
ParticipantHmm… puppy photography sounds a lot like calf photography, except that I’m hazarding a guess that they move a little less fast! 🙂 We’ve done a bit of “pet” (livestock) photography, too, so I really enjoyed reading this. I’m going to have to try this out on our barn cat’s six kittens once they start crawling around!
June 23, 2016 at 10:32 am #17537ModeratorYeah, up to about 6 weeks old, puppies are pretty slow, as far as running away from you. But that doesn’t necessarily mean that they just sit still for you. Oh no! 🙂
June 23, 2016 at 11:46 am #17545James StaddonKeymasterThat would be awesome, @frazer-family! Would very much enjoy hearing about how you shoot that, with the 6 kittens.
And what’s it like shooting livestock? I was asked a while back to photograph someone’s livestock. The job never materialized, but it sure would be good to be prepared with tips from someone with at least more experience….
June 26, 2016 at 3:21 pm #17668Hannah MooreParticipantThis is my first time for photo shooting for the puppies after @buddingphotographer gave me suggestions! My first opinion on the down side in the first picture is, two things; distracting items, and maybe I needed to be down a little lower to the puppies level’s, tip #4. I couldn’t think of much else, except for maybe giving the subjects a little more breathing space. You can figure out the positive side!! 🙂
I took about 60 to 70 pictures!! I got only a few “okay” ones! Kind of like you said in tip #6, “You have to take a lot of pictures to get one good picture!!”…I found that out!
I haven’t put a whole lot of effort into taking pictures of them yet though, I’m working on it!- This reply was modified 56 years, 7 months ago by .
Attachments:
-
AuthorPosts


You must be logged in to reply to this topic.