I was going through pictures today and came across two practically identical waterfall pictures I took last month at Bond Falls State Park, Michigan. Notice how the second picture looks so much better than the first one. Both were taken on a tripod only 26 seconds apart from each other on a partly cloudy day. Notice the differences between the two:

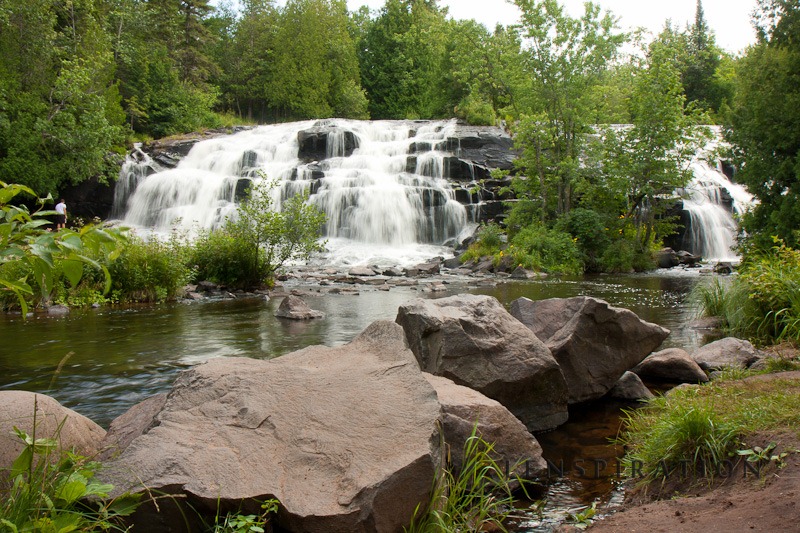
All exposure settings during capture (including exposure bias and focus point) and slight tweaks during post-processing are identical between the two pictures; that is, except for two things: the aperture and shutter speed. A = f/8.0 at 1/200 sec; B = f/22 at 1/10 sec.
Such a small change makes such a big difference. Not only is the waterfall smooth, but the overall impression of the image is smooth. No more shadows on the foreground rock, less contrast in the background trees, and the foreground stream running off the to the left appears to be velvet.
My only regret: I wish I had been able to use a 2- or 3-stop Neutral Density Filter to make the shutter speed even slower. I wonder what it would have looked like then.


Wait, you are able to change light patterns by changing aperture/shutter? I wish I could do that!
Yes, the slower shutter smoothed out the water, but it did not change the ambient range, nor the shadows on the rock. Clouds can change things quite a bit in 26 seconds. 😉
This is a perfect example of how waiting for the light can drastically improve a photo. In this case, cloud cover decreased the visual clutter and harsh highlight/shadow difference to better match the intended look.
The light is great in this photo, but I’d reduce the comp to just frame the left waterfall section, or perhaps a tighter crop on the right, with the submerged rocks. The color there is pretty awesome. 😛 That’s just me, of course. 😀
As always, keep it up, and God bless!
I have to disagree on which picture is better. I actually think that the first picture has much more dynamic lighting, and second picture looks bland and uninteresting in comparison. The advantage of the second picture, of course, is the smooth water. Personally, I would digitally superimpose the smooth water of the second picture into the first picture for optimal effect (supposing you have the time to make these kinds of tweaks).
I’m also perplexed about how the light patterns changed due to different exposure. It looks like there are leaf patterns on the rock in the foreground, on the first picture but not the second. Perhaps moving clouds gave you direct sunlight for the first picture, and full cloud cover on the second. Not sure how else to explain it.
Anyway, great work, thanks for posting and commenting!
You’re comments are always appreciated, Ben!
BEAUTIFUL PICTURES! I took one almost just like that!
Those neutral density filters (NDF) do amazing things to a picture. I love to stack neutral density filters on top of each other allowing for incredibly SLOW shutter speeds with ZERO cloud cover! Awesome picture James! Keep up the outstanding work.
Do you have your similar picture posted online anywhere, Elizabeth?
So Kerzdenn, what brand/type/”potency” of ND filters do you recommend?
James, I would highly recommend reading this article on ND filter usage/types/prices:
http://strobist.blogspot.com/2010/06/using-nd-filters-to-kill-depth-of-field.html